
Ship Same Day*
We ship from multiple U.S. production locations to reach customers faster, with FedEx delivering to most locations in 1–3 business days. Express shipping is available.


Remove the frame from the box, then unscrew the single packaging screw from the frame post.
Slide the horizontal support tracks on to the sign face so they are even with the edges of the sign. Check that the tracks line up with the holes in the vertical posts before screwing the tracks. Screw the small screws into the pre drilled holes. Place 2 starter arrows in the corrugation openings on the edge of the sign, approximately 16” apart. Place the vertical posts on the ground, with the slot for the sign facing up . Twist out the tab in the center of the slot. Lift the sign, tracks and arrows, and slide one corner into the slot on the post until it hits the stopper. Work the sign into the slot from the inserted corner to the opposite corner, Screw the sign and tracks into place with the large screws. Lift the sign and the attached post to insert the sign into the second post starting at one corner. Install the large screws.
Screw the four large head screws into the vertical posts. Screw the eight small head screws into the horizontal supports. With standard vinyl flat caps place them at the top of the vertical posts, with the gothic post cap option use the screws provided. Do not skip any screw holes.
Using the sign as a spacing guide dig the holes 18" to 24" deep depending on the soil. Maneuver the assembled sign into the holes. Insure the sign is level and re-fill the holes packing them tightly.
Warning: Wear safety equipment including leather gloves and eye protection. Due care should be taken to avoid blocking visibility, pathways etc. Consult the proper authorities prior to installing the sign to insure there are no underground hazards, obstacles, utilities, pipes, etc.. There may be local regulations regarding the use of these signs.
------- or --------
Using the sign as a spacing guide drive the t-post 12 inch to 18 inch deep, depending on the soil, on a level surface. Simply lift the assembled sign frame and slide it over t-posts. Tip: Pounding the t-posts on a slightly angled away from each other will hold the sign snug.
Warning: Wear safety equipment including leather gloves and eye protection. Due care should be taken to avoid blocking visibility, pathways etc. Consult the proper authorities prior to installing the sign to insure there are no underground hazards, obstacles, utilities, pipes, etc.. There may be local regulations regarding the use of these signs.
We ship from multiple U.S. production locations to reach customers faster, with FedEx delivering to most locations in 1–3 business days. Express shipping is available.
Free Professional Design Help. Design your sign online using our easy, EZ design tool, or let our experienced designers create it for you. No design fees. No hassle. Just production-ready files.
Fast Turnaround, Nationwide. From proof approval to production, we move fast. Our streamlined process and multiple U.S. facilities ensure quick turnaround without sacrificing quality.
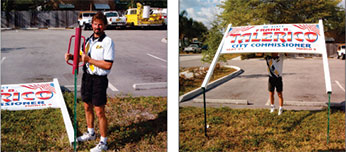
Easy to Install Post Kits. Our industry-standard post kits are designed for quick, tool-friendly installation. Lightweight, collapsible, and easy to transport—fits in most car trunks.
Real Customer Support. Place orders online, by phone, or by email. Our knowledgeable support team responds in minutes, not days, to keep your project moving.
With three generations of sign makers, we have been helping commercial Realtors, auctioneers, and builders succeed for over 40 years. Proven products. Proven reliability.